I already ran Caddy at home for Home Assistant. This article is the AWS edge version: EC2 (often t4g.nano), automatic HTTPS, JSON access logs in CloudWatch, a nightly Python shipper, and Lambda + Step Functions for cheap observability — not a SaaS dashboard bill. Version française.
Architecture story
flowchart LR
  User[Visitors] --> Caddy[Caddy on EC2]
  Caddy --> Files[Rotated JSON logs]
  Files --> Cron[Python shipper cron]
  Cron --> CW[CloudWatch Logs]
  CW --> Lambda[Lambda Insights query]
  Lambda --> SFN[Step Functions optional glue]
Homelab taught me to like Caddy’s Caddyfile ergonomics. AWS taught me to like paying cents for a nano instance when traffic is personal-scale.
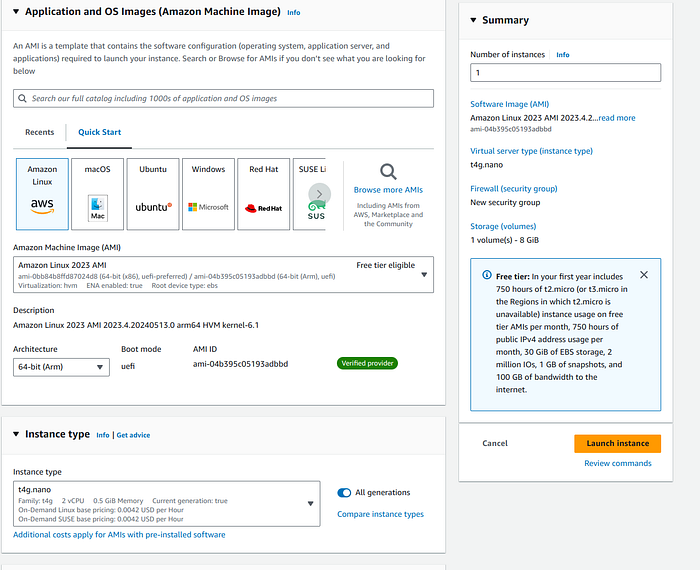
Step 1 — EC2 + Caddy
- AMI: Amazon Linux 2 (or similar).
- Instance:
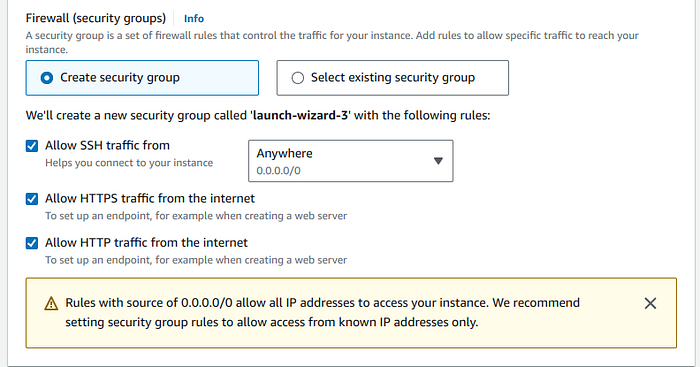
t2.microfree tier ort4g.nanowhen you want ARM cheap always-on (~$0.10/day in the original notes). - Security group: 22, 80, 443.
Install:
sudo yum update -y
sudo yum install -y yum-utils
sudo yum-config-manager --add-repo https://dl.cloudsmith.io/public/caddy/stable/rpm.repo
sudo yum install caddy -y
Caddyfile pattern
Per-site log snippets + reverse proxy to CloudFront or local services:
{
  email [email protected]
  servers { metrics }
  admin :2019
}
(log_site) {
  log {
    output file /home/ec2-user/caddy/logs/{args[0]}.log {
      roll_size 10mb
      roll_keep 5
      roll_keep_for 168h
    }
    level INFO
  }
}
example.com www.example.com {
  import log_site example.com
  reverse_proxy https://your-origin.example
}
Reload: sudo caddy reload.
Step 2 — CloudWatch without drowning in files
Caddy writes rotated JSON logs under /home/ec2-user/caddy/logs/. A small boto3 script reads each file stream and put_log_events into group reverse_proxy (create group/stream on first sight).
Schedule with cron at night so daytime SSH stays quiet:
0 0 * * * /usr/bin/python3 /home/ec2-user/cloudwatch.py
Core loop (abbreviated):
cloudwatch = boto3.client("logs", region_name="us-east-1")
log_group_name = "reverse_proxy"
# for each .log file → log stream → put_log_events per line
Full script: Medium original.
Step 3 — Lambda + Insights queries
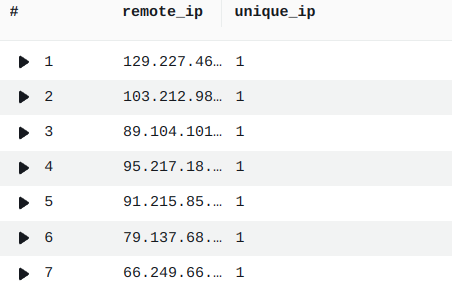
Lambda can run CloudWatch Logs Insights queries on a schedule (via Step Functions in the full write-up). Example — distinct remote IPs:
fields @message
| parse @message /"remote_ip": "(?<remote_ip>[^"]+)"/
| stats count_distinct(remote_ip) as unique_ip by remote_ip
| sort unique_ip desc
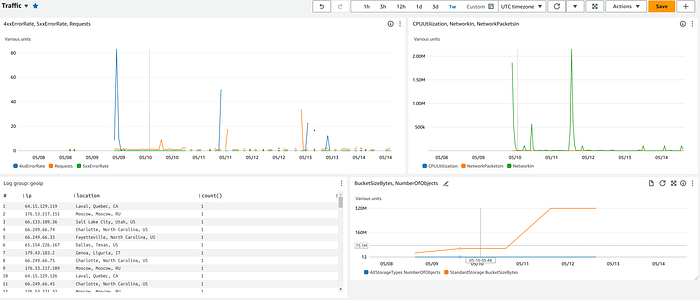
Geo / location parsing variant:
fields @timestamp, @message
| parse @message /"IP": "(?<ip>[^"]+)", "Location": "(?<location>[^"]+)"/
| stats count() by ip, location
| sort count desc
Cost and ops notes
| Choice | Tradeoff |
|---|---|
| nano EC2 | Cheap; CPU spikes on log crunch |
| File logs + cron shipper | Simple; not real-time |
| Lambda queries | Pay per run; watch free tier |
| Caddy metrics endpoint | :2019 admin — lock down SG |
When not to use this stack
- High-traffic production multi-tenant edge — use managed CDN/WAF.
- Strict real-time SIEM — batch shipper is too slow.
- Teams allergic to SSH maintenance — consider Fargate + sidecar.
Takeaway
You can get structured reverse-proxy visibility without Datadog money if you accept cron delays and a little Python glue.
Related posts
- Home networking evolution — where Caddy started for me
- AWS Cloud Practitioner journey
Originally published on Medium. Step Functions wiring: see Medium for full Lambda/SFN listings.